How to Customize Your Wedding Website Template in Framer
This guide will help you customize your wedding website template in Framer. You can replace the demo content with your own names, date, location, weekend schedule, RSVP form, registry link, and guest information
Hero Section
The Hero section is the first part your guests will see when they open your wedding website. It should immediately communicate the most important details: who is getting married, when the wedding is happening, where it will take place, and how guests can confirm their attendance.
In this template, the Hero includes the couple’s names, the wedding date and time, the main venue, and a call-to-action button that links to the RSVP section.
Start by replacing the demo names with your own names. Then update the wedding date, the time, and the venue information.
Fields to update:
Couple names: Alessandro & Bianca
Date and time: Saturday, 08 May, 2027 at 4:30´clock
Venue: Smog Shoppe 2651 S La Cienega Blvd

Events Section
This section is where you can share the schedule of your wedding celebration.
Depending on the type of wedding you are planning, you can use this section in two different ways:
Use “The Weekend” if your celebration includes events across multiple days, such as welcome drinks, the wedding day, farewell brunch, or other guest activities.
Use “The Day” if your wedding happens on a single day and you only need to show the main timeline, such as the ceremony, cocktail hour, dinner, reception, and after party.
You can rename the section title directly inside Framer. For example, change “The Weekend” to “The Day” if your wedding does not include multiple days of events.
Each day can include one or multiple events. Keep the date once, then place all related events below it.


How this section is organized
Inside Framer, the schedule is organized like this:
Schedule Timeline > Day Group > Event List > Event Item
Schedule Timeline
The container that holds all the days and events.Day Group
A group for one specific day, such as Friday, Saturday, or Sunday.Event List
The list of events inside that day.Event Item
A single event, such as Ceremony, Cocktail Hour, Reception, Welcome Drinks, or Farewell Brunch.
This structure makes it easier to add, remove, or edit events while keeping the layout consistent.
What each event includes
Each event follows the same basic structure, so the schedule stays consistent and easy to scan.
A typical event item includes:
Event name
The title of the event, such as Ceremony, Cocktail Hour, Reception, Welcome Drinks, or Farewell Brunch.Time
The start time or time range for the event.Location
The venue name and address where the event will take place.Attire
An optional note about what guests should wear.Transportation
An optional note about parking, shuttle service, rideshare, or how guests should get to the location.Additional details
An optional short description with anything guests should know before arriving.Map button
A button that links directly to the event location on Google Maps.
Attire, transportation, and additional details are optional. For smaller events, you may only need the event name, time, location, and map button. For the main wedding event, it is usually helpful to include more details, such as dress code, arrival notes, parking information, or shuttle availability.
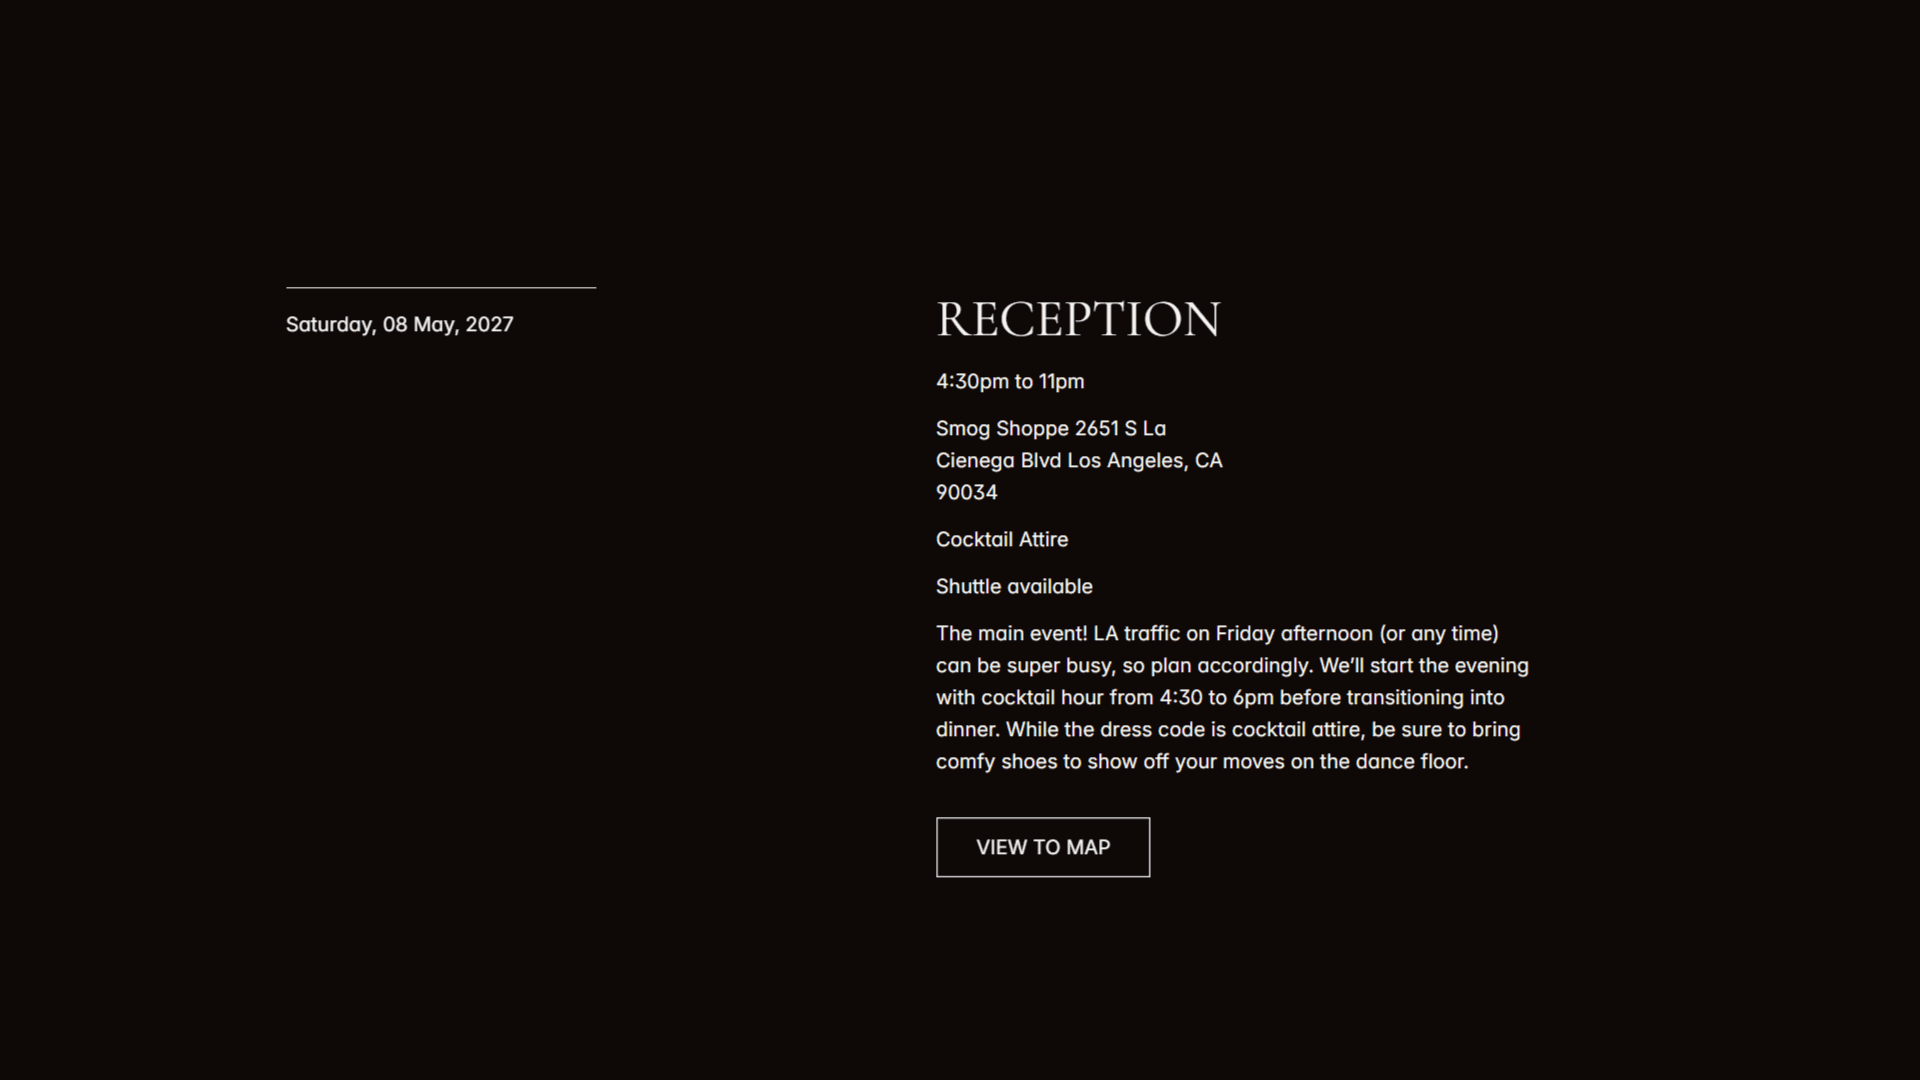
How to edit the date and events
Edit the date
To edit the date of a day, click the date directly on the canvas, or select the Date layer in the left sidebar, then replace it with your own wedding date.
For example, you can change:
Saturday, 08 May, 2027 to Sunday, 25 December, 2028
Each Day Group should have one date only. If you have multiple events on the same day, keep the date once and place all related events below it.
Edit an event
To edit an event, select the Event Item inside the Event List.
Inside each Event Item, you can update the event name, time, location, optional attire, optional transportation note, additional details, and the Google Maps button.
Click each text directly on the canvas, or select the text layer in the left sidebar, then replace the demo content with your own event details.
For example, you can change:
Welcome Drinks to Ceremony
8pm to Close to 4:30pm
Palihotel to Smog Shoppe
Edit the Map button
To change the map link, click the VIEW TO MAP once.
Then go to the right sidebar, find the Link field, and paste the correct Google Maps URL there.
After updating the link, preview the page and test the button to make sure it opens the correct location.

How to create a new day or event
Create a new day
To create a new day in the schedule, duplicate an existing Day Group inside the Schedule Timeline.
Select the Day Group you want to duplicate, then duplicate it inside Framer.
This will create a new day with the same date style, event layout, and spacing as the original one.
After duplicating the Day Group, update the Date text with the new date.
Then edit or replace the events inside that new Day Group.
Create a new event
To create a new event inside an existing day, duplicate an existing Event Item inside that day’s Event List.
After duplicating the Event Item, replace the demo content with the new event details.
Keep the date once at the top of the Day Group. All events for that date should be placed below it.
How to remove a day or event
Remove a day
If your wedding only happens on one day, you can remove the extra Day Groups from the schedule.
To remove a full day, select the entire Day Group in the left sidebar, not just the date text or individual events.
Then delete the Day Group you no longer need.
For example, if you do not need Friday or Sunday events, delete the Friday and Sunday Day Groups and keep only the main wedding day.
After removing extra days, you can rename the section from “The Weekend” to “The Day”.
This keeps the page simpler and avoids showing empty or unnecessary event sections.
Remove an event
To remove a single event, select the Event Item you no longer need and delete it.
You can find it by following this structure:
Schedule Timeline > Day Group > Event List > Event Item
For example, if you do not have an After Party, Farewell Brunch, or Welcome Drinks, you can remove those Event Items from the Event List.
Accommodations Section
The Accommodations section is where you can share recommended places for guests to stay during the wedding celebration.
This section is especially helpful if you have guests traveling from another city or if your wedding includes multiple events across the weekend.
You can use this section to recommend hotels, nearby stays, room blocks, or specific areas close to the venue.
How this section is organized
Inside Framer, the accommodations section is organized like this:
Accommodations > Accommodation List > Accommodation Item
Accommodations
The full section that contains the title, short description, and list of recommended stays.
Accommodation List
The container that holds all hotel or stay recommendationsAccommodation Item
A single hotel, stay, or recommendation inside the list.
This structure makes it easy to edit, duplicate, remove, or reorganize the recommended places.
What each accommodation item includes
Each accommodation item follows a simple structure, so the section stays consistent and easy to read.
A typical accommodation item includes:
Hotel or stay name
The name of the hotel, Airbnb, guest house, or recommended area.Address
The full or simplified address of the accommodation.Description
A short note explaining why this place is recommended.Booking button
A button that links to the hotel website, booking page, Airbnb listing, or reservation link.
How to edit an accommodation item
To edit a hotel or stay recommendation, select the Accommodation Item you want to customize.
Click each text directly on the canvas, or select the text layer in the left sidebar, then replace the demo content with your own information.
You can update:
Hotel or stay name
Replace the demo name with the name of the hotel, Airbnb, guest house, or recommended area.Address
Replace the demo address with the correct location.Description
Add a short and helpful description for guests. Mention why this place is useful, such as being close to the venue, near restaurants, or part of a room block.Booking button
Update the button link with the correct booking or reservation URL.

Edit the book button
To change the booking link, click the BOOK button once.
Then go to the right sidebar, open the component options, find the Link field, and paste the correct hotel, booking, or reservation URL there.
After updating the link, preview the page and test the button to make sure it opens the correct page.
How to create a new accommodation item
To add another hotel or stay recommendation, duplicate an existing Accommodation Item inside the Accommodation List.
You can find it by following this structure:
Accommodations > Accommodation List > Accommodation Item
Select the Accommodation Item you want to duplicate, then duplicate it inside Framer.
This will create a new item with the same layout, spacing, typography, and button style as the original one.
After duplicating it, replace the hotel name, address, description, and booking link with the new accommodation details.
How to remove an accommodation item
If you do not need one of the recommended stays, select the entire Accommodation Item and delete it.
You can find it by following this structure:
Accommodations > Accommodation List > Accommodation Item
Make sure you delete the full Accommodation Item, not only the hotel name, address, or button.
For example, if you only want to recommend one hotel, delete the extra Accommodation Items and keep the most important option.
If your guests do not need hotel recommendations, you can remove the entire Accommodations section from the page.
Our Story Section
The Our Story section is an optional section where you can add a short personal message about the couple.
You can use it to share a simple story, a meaningful memory, or a few words about the celebration. If you prefer a more direct wedding website with only practical information, you can remove this section.
In this template, the section is structured with a title and a short story divided into three text blocks.
Title
The section title, such as “Our Story”.Story text
A short message about the couple, usually divided into two or three small paragraphs.
To edit this section, click the title or story text directly on the canvas, or select the text layer in the left sidebar, then replace the demo content with your own words.
If you do not want to include a story section, select the entire Our Story Section in the left sidebar and delete it from the page.
Gift Registry Section
The Gift Registry section is where you can share a gift list, registry link, honeymoon fund, contribution page, or any external page where guests can send a gift.
This section is optional. If you do not want to include a gift registry, you can remove the entire section from the page.
In this template, the section includes a title, a short message, and a button that links to the registry page.
Title
The section title, such as “Gift Registry”.Description
A short message explaining that gifts are optional and sharing where guests can contribute.Registry button
A button that links to your gift registry, store list, contribution page, or honeymoon fund.
To edit the text, description directly on the canvas, or select the content > description in the left sidebar, then replace the demo content with your own message.
To change the registry link, click the button once. Then go to the right sidebar, open the component options, find the Link, and paste your registry URL there.
After updating the link, preview the page and test the button to make sure it opens the correct registry.
If you do not want to include this section, select the entire Gift Registry Section in the left sidebar and delete it from the page.
FAQ Section
The FAQ section is where you can answer common guest questions before they need to contact you.
This section is optional, but it is useful if you have important details about plus ones, children, dress code, photos, transportation, parking, or arrival time.
In this template, the FAQ is built as a component. To edit the questions and answers correctly, you first need to enter the component.
How to edit a FAQ question
To edit the FAQ, double-click one of the questions on the canvas.
This will take you inside the FAQ component.
Once you are inside the component, click once on the question you want to edit.
When you select a question, the right sidebar will show the editable fields for that FAQ item.
From there, you can update:
Question
Replace the demo question with your own question.Answer
Replace the demo answer with your own response.
For example, you can change:
Can I bring a plus one? to What should I wear?
Then update the answer in the right sidebar.
How to add a new FAQ question
To add another question, double-click one of the FAQ questions to enter the component.
Then right-click on the second or third FAQ question and choose Duplicate.
Avoid duplicating the first question, because it may have a slightly different structure from the other FAQ items.
After duplicating a question, click once on the new item.
Then go to the right sidebar and replace the Question and Answer fields with your own content.
How to remove a FAQ question
To remove a question, double-click one of the FAQ questions to enter the component.
Then select the full FAQ item you no longer need and delete it.
Make sure you delete the full FAQ item, not only the question text.
How to remove the FAQ section
If you do not want to include a FAQ section, select the entire FAQ section in the left sidebar and delete it from the page.
This section is optional, but it can be helpful for guests. A short FAQ can reduce repeated questions and make the wedding details easier to understand.

RSVP Section
The RSVP section is where guests can confirm whether they will attend the wedding.
This is one of the most important sections of the website, so make sure the form is connected to the correct email before publishing.
In this template, the RSVP form includes:
Your Full name
The guest’s name.Will you attend?
Whether the guest will attend or not.Number of guests
How many people are included in the RSVP.Dietary restrictions
An optional field for food allergies or dietary preferences.Submit button
The button guests click to send their RSVP.
How to edit the form fields
To edit a field, click the field label or input inside the RSVP form.
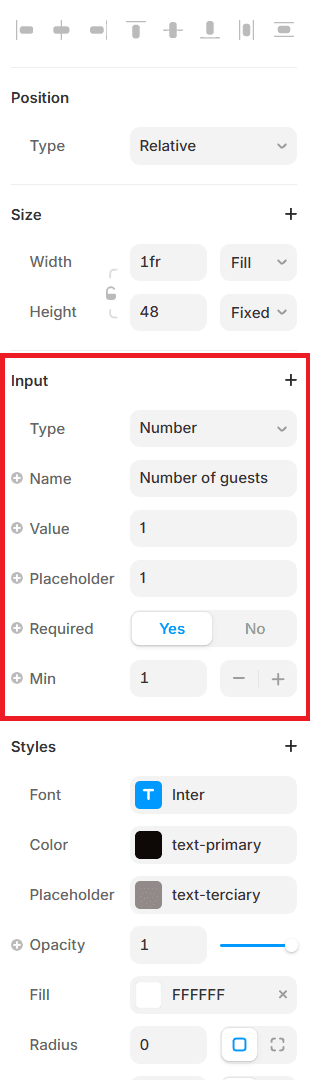
You can update the visible label directly on the canvas, and you can adjust the field settings in the right sidebar.
For each field, check:
Label
The visible text guests see above the field.Name
The internal field name used when the form is submitted.Placeholder
The example text shown inside the field.Options
For dropdown fields, update the available choices.
How to edit the attendance options
The attendance field is a dropdown.
Select the attendance field and go to the right sidebar to edit its options.

How to configure the RSVP email
To make sure RSVP submissions are sent to the correct place, select the form.
Then go to the right sidebar and open the form settings.
Update the email settings with your own information.
Before publishing, always test the RSVP form in Preview.
The form will only send real submissions to your email when it is tested through the live preview or published website. After setting up the recipient email, submit a test RSVP and check your inbox to make sure the message arrives correctly.
Make sure the guest name, attendance, number of guests, dietary restrictions, and any custom fields appear in the email before sharing the website with guests.

How to create new form fields
If you need to collect more information from your guests, you can add new fields to the RSVP form.
To create a new field, select an existing Field Group inside the RSVP form and duplicate it.
After duplicating the field, update the field label, placeholder, field name, and settings in the right sidebar.
Each form field should have:
Label
The visible text guests see above the field.Name
The internal field name used in the email submission.Placeholder
The example text shown inside the field.Required setting
Choose whether the field must be completed before the form can be submitted.Options
For dropdown fields, update the available choices in the right sidebar.
For example, you can add fields such as:
Email address
To collect the guest’s email.Phone number
To collect a contact number.Guest names
To ask for the names of additional guests.Song request
To let guests suggest a song for the reception.Message to the couple
To let guests leave a short note.Meal choice
To let guests choose between dinner options.
Message Section
The Message section is where you can add a short note from the couple to the guests.
This section is optional, but it can make the website feel more personal and welcoming. You can use it to thank your guests, share a warm message, or add a final note before the RSVP or footer.
In this template, the Message section is designed to be simple: a short piece of text that feels personal, elegant, and easy to read.
How to edit the message
To edit the message, click the text directly on the canvas or select the text layer in the left sidebar.
Then replace the demo text with your own message.
Keep the message short and natural. One or two short paragraphs are usually enough.